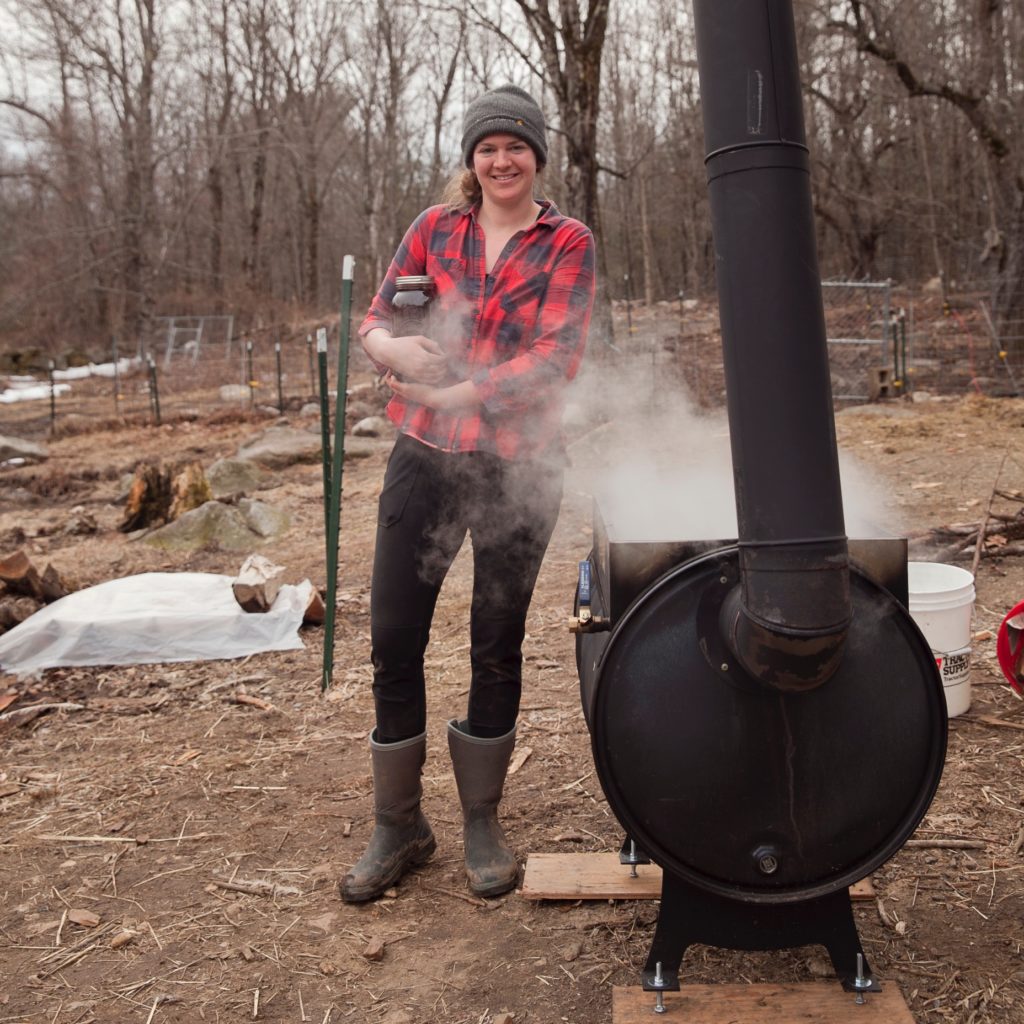
After what felt like an eternity, the sap finally started running! Despite the seemingly slow start to the season, we have had ideal conditions for the past two weeks. The sap has been filling my buckets and the weather isn’t showing any signs of it slowing down. I have been collecting sap daily from my 18 taps (I went a little over what I capped myself at…shocker) and stockpiling it in a food grade 55 gallon drum. Once it’s full, I boil. Tis’ the season indeed.
This is my first year sugaring as I mentioned in my previous blog post, and I honestly don’t know what I would do without my Vermont Evaporator Company Sapling Evaporator. It has been a lifesaver throughout this new venture, and with the volume I’m collecting I couldn’t imagine doing it any other way. Without it, I’d be in a stressful “how am I going to get all of this done?!?” situation, and I would not enjoy it. When working full time and running a homestead, time is precious, and the evaporator has allowed me to be efficient as possible while capturing that delicious syrup.
We did a “trial run” with the evaporator when we had about 25 gallons collected to get the unit properly seasoned and get our feet wet. There were some initial hiccups that can be anticipated when learning any new piece of equipment, not to mention the fact that we have never boiled sap before! But, we quickly found our groove and made some minor modifications to the evaporator as well as the process that helped us be more efficient.
Adjusting the Level
The Sapling Evaporator is a continuous flow unit which essentially means that the sap flows through the baffles in the pan as it boils down and becomes closer to a syrup-like consistency. Once it has reached syrup (or close to it) you open the exit valve to draw it out. In order to properly to do this, the unit has to be perfectly level so that it’s the density that determines the flow versus a pitch or tilt in the unit.
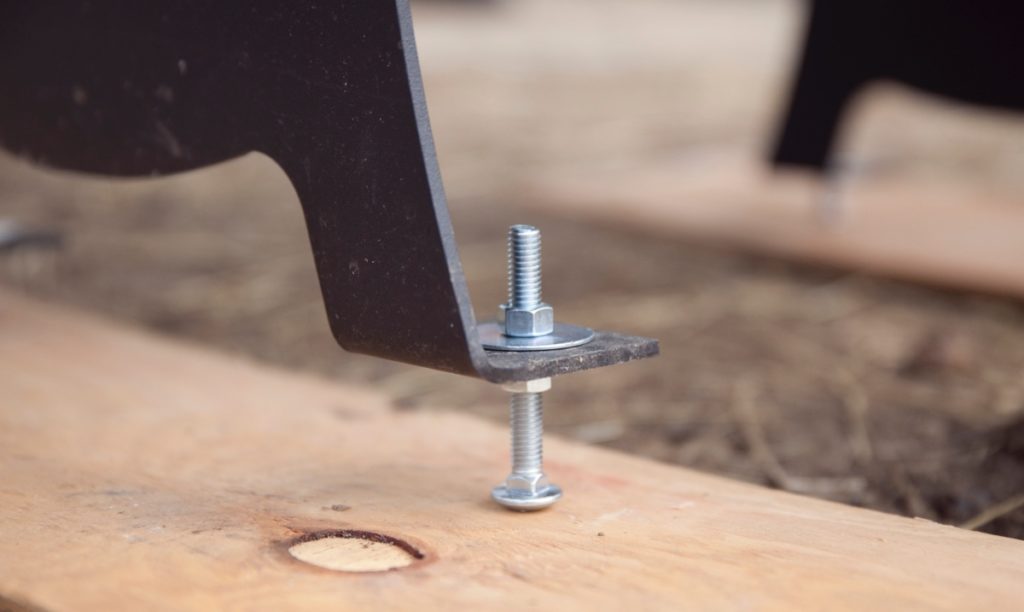
In our trial run, we really struggled with getting the evaporator perfectly level. We have a dirt driveway, and using cinder blocks/bricks, etc didn’t work for us. We could never get it quite right, which affected the continuous flow! This is after all one of the key benefits of the Sapling and what makes it so efficient. Then, my husband had the brilliant idea to create adjustable feet in order to quickly and easily adjust the level of the evaporator. Carriage bolts fitted through the predrilled holes, with two washers and two nuts per foot worked like a charm. We were able to quickly and easily adjust and readjust the level no matter where we set it. No bricks or cinder blocks needed, just a turn of the nut! Unless you have a perfectly level area that you can set the evaporator on, I highly recommend going this route. Cheap hardware will save you a lot of time shimming and some headaches.
Finishing the Boil off the Evaporator
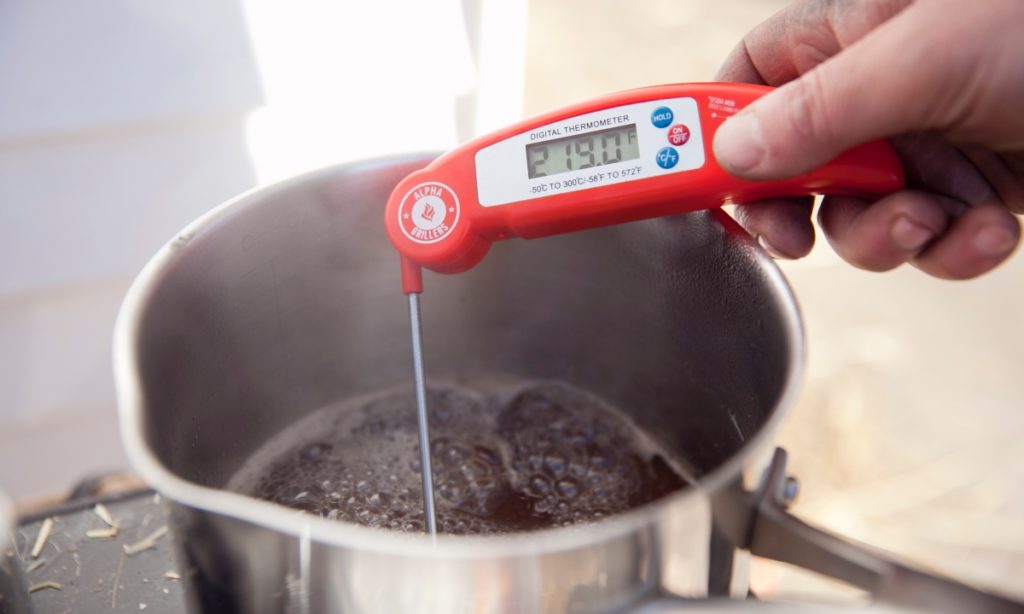
Sap officially becomes “syrup” when the water has evaporated and it has reduced to the point that it reaches 66.6% sugar, or 219˚F. During the trial run, I quickly learned what finesse and skill it took to get the sap to finish at the required 219˚ F on the evaporator. No matter how hard I tried, I couldn’t get it there. Then finally, after hours and hours of boiling I finally hit it, but ran the sap level so low in the pan that I scorched it and ruined the syrup in the process. Lesson learned.
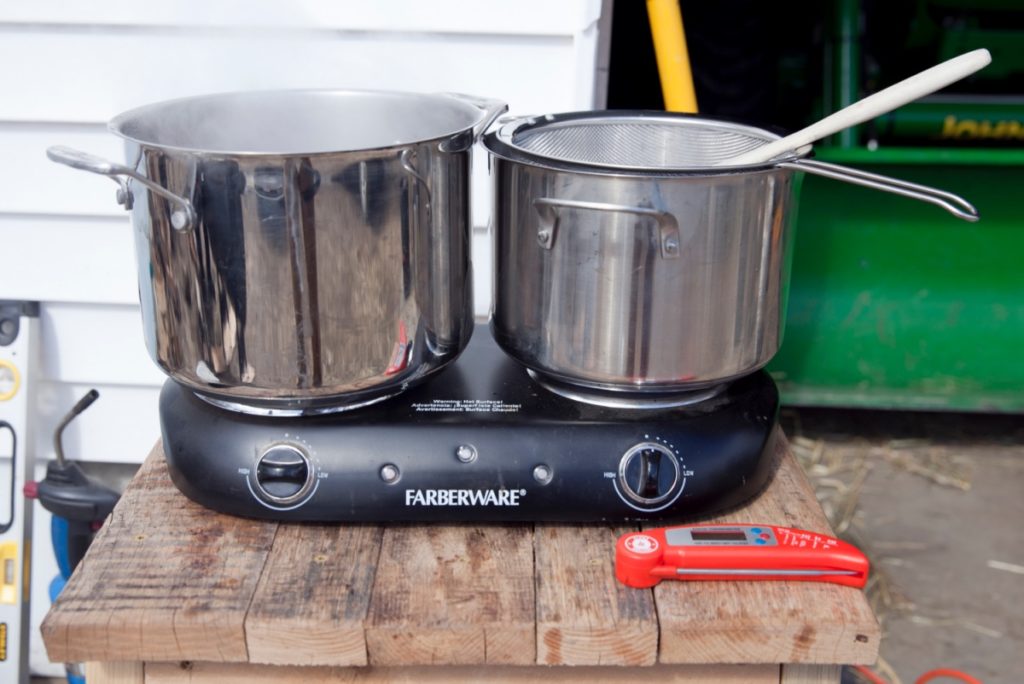
Now, there are plenty of people out there that have the skill and ability to finish syrup on the evaporator without burning their hours of hard work like I did. I however, do not possess such skill (not yet at least), and if you don’t either there’s no shame in it! It only took the one time for me to learn my lesson, and from that point on I started drawing off the sap that was very close to syrup (~213˚-215˚F) and finishing it on an electric burner outside. This gave me complete control over monitoring and controlling the heat without running the risk of boiling the level too low and scorching my pan, giving me a perfect 219˚F syrup every time! Maybe someday I will get good enough regulating the level of the sap and the temperature and be able to finish the syrup on the evaporator. But honestly, it’s no big deal if I don’t. This way works just as well, and all that matters is that you get the syrup!
My Process
Now that I have a few boils under my belt, I feel like I’ve found my groove and have a process in place that works for me. Every time I get better, and am able to boil more sap in the same amount of time. If you aren’t familiar with the Sapling unit and its operation, reviewing the instructions will help you have a better understanding of my process:
- First things first on boiling day, get the fire going in the evaporator first thing. I will do this before I even get started on the morning chores with the animals just to give it time to get cranking and then by the time I’m done with my morning feedings I’m ready to start boiling sap.
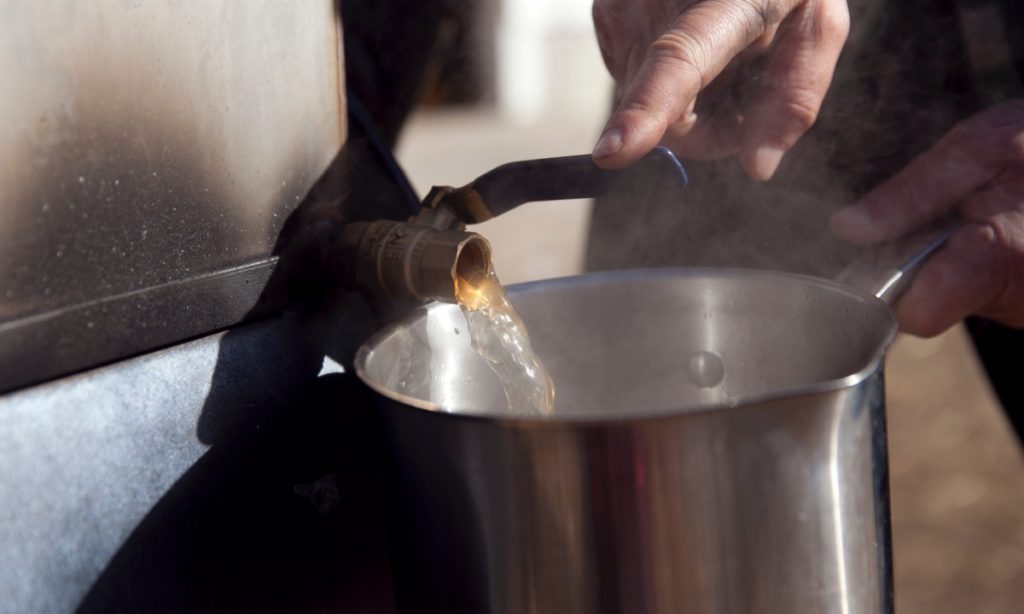
- Once I have a good fire going, I put the evaporator pan on and immediately add my leftover sap from the previous boil to the pan closest to the exit valve, and fresh sap to opposite corner of the evaporator pan.
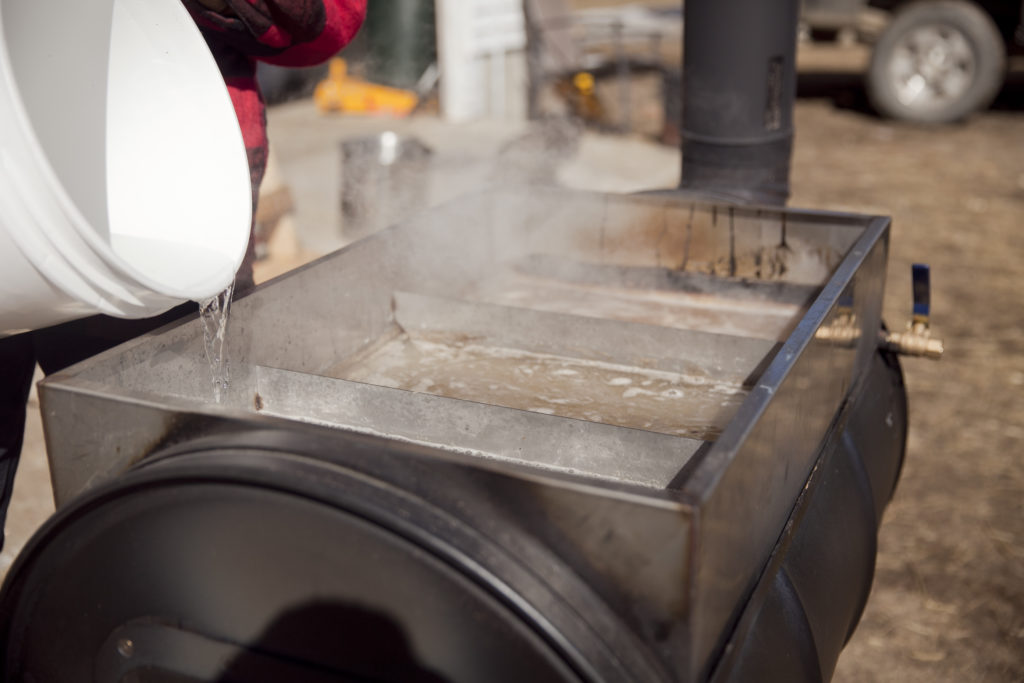
3. Then I wait, and tend to the fire while keeping as strong and consistent of a boil as possible while maintaining the 2″ depth in the pan. Once the syrup-like sap closest to the exit valve is as hot as I am going to get it in the pan, I draw off anywhere from 6-8 cups and replenish the pan with sap straight from the storage drum.
4. The syrup-like sap that was drawn off goes straight to the electric burner where I can closely monitor it until it reaches 219˚F. Once it hits this temperature, I dump it through a fine mesh filter lined with cheesecloth into a separate pot that will stockpile the day’s syrup.
5. By the time the syrup is finished on the electric burner, the evaporator has boiled down a substantial amount of sap and it’s to the point that I can draw more off and finish it on the burner. From here, it’s rinse and repeat all day long until I have used all of the sap in my storage barrel. It’s an all day event tending to the fire, monitoring temperatures, drawing off sap, and filtering syrup.
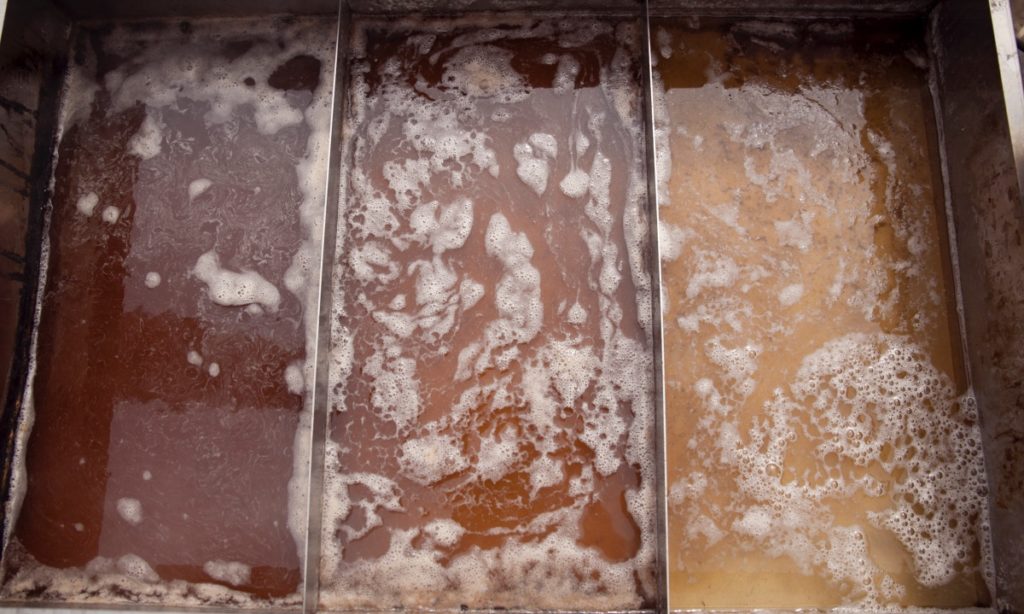
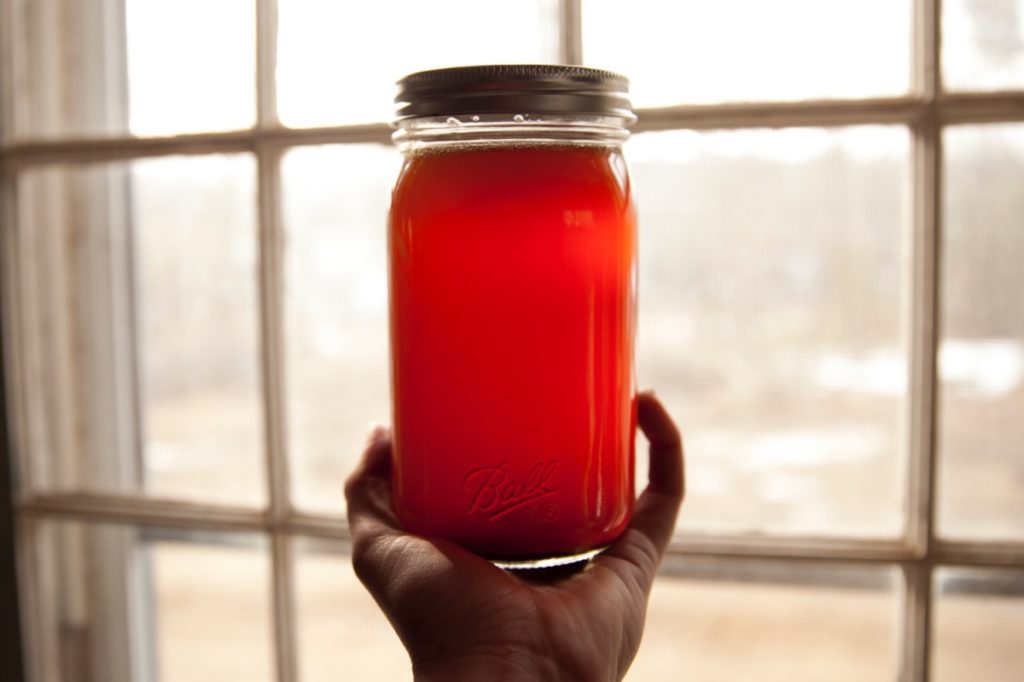
6. At the end of the day, all of the syrup is warmed up and poured through a fine final filter to collect the sugar sand and yield a cleaner and clearer syrup before being stored in mason jars.
The Results
I can’t help but laugh to myself that I wasted so many years thinking sugaring was an extremely difficult process. It’s really not! Yes, it is time consuming, and there is absolutely no way around that when you’re boiling off such a substantial amount of water. But, an evaporator such as The Sapling certainly does help speed the process up and make you more efficient, which means that you can boil more in a day! Our boiling days have lasted anywhere from 12-13 hours. So, is it hard? No. But is it time consuming? Yes.
As I have previously mentioned, the industry “standard” is a 40:1 ratio of sap to syrup. This ratio as well as how good the sap runs varies greatly on so many different factors. How mild the winter was, the snow fall, the trees sun exposure (in the woods or in open land), the trees health, and whether there have been drought conditions or not all have an effect.
So far this season I am averaging about 1.25-1.5 gallons of sap per day per tap. Some taps are better producers than others, and in every case the trees that are in the open versus in the woods produce a higher volume. Despite the milder winter and less snowfall, I am hovering right around that 40:1 ratio as well which is always a good thing!
Some Things I Learned
When learning any new skill there is a learning curve of some extent involved. The sugaring season may be a small blip on the year’s radar, but it’s a pretty intense one and you quickly learn on your feet. I have only been boiling for a week, but have already done it three times! I have certainly learned some valuable lessons that I will take with me into next year’s season and beyond:
- Figure out what works best FOR YOU when tapping your trees. You could ask ten different people that have been surgaring for years when and how they determine it’s time to tap their trees and you’ll get varying responses. I know I did. Everyone swears by something different. Some strictly go based on the weather but never before a certain date. Others tap early so they can get an early run while some say absolutely not to tap early because the holes will close up. Everyone swears by something different and it will make your head spin. I have a combination of taps that I put in at the end of January and others only a couple weeks ago before the sap really started running. At first, when the sap started running recently the trees that I had tapped early weren’t producing. I thought that maybe I had screwed up and tapped too soon and the holes had closed up. Well, it took a few ideal days but wouldn’t you know I’m getting buckets full of sap from those trees as well? So what’s the “right” way? Beats me! I don’t think there is necessarily any one best way, you just need to find what works best for you and your operation.
- Make sure you have seasoned sugar wood. Man, I can’t stress this one enough. Of course this is common knowledge and seems like a no brainer, but it’s something we have been struggling with. Going into the season we had pine trees that had been down for a couple years and thought for sure that they would be dry enough to just cut and split to use shortly before the season started. Wrong. The wood was in fact not seasoned enough, meaning we struggled to get a good boil which made us horribly inefficient. So, we have been collecting standing dead pine and any other dry wood we can to limp us through. For next year we will definitely have all of our sugar wood cut, split, and stacked in the summer. Lesson learned.
- Don’t plan on doing much else that day. Like I said before, making maple syrup is not hard but it is time consuming! It truly is an all day event that you can’t get away from for more than fifteen minutes, and it always seems to take me longer than I think it will. I am certainly getting better at it every time, but it is still a full day event and I have never been able to finish under 12 hours. So, on boil day I may have other little projects that I can do around the homestead, but nothing too involved and I make sure I don’t need to leave the house.
- It’s a lot of work but it really IS that delicious. Just like with anything else homegrown or homemade you have a greater appreciation for it and it’s always better than store bought. Homemade maple syrup is no different! Yes, it’s time consuming. But, you only get one shot at it in a short window of opportunity each year and it’s a very fulfilling (and fun) process. Also, not to mention the fact that it is so delicious! Maple syrup in coffee, on pancakes, made into sugar, and used in baking…the possibilities for this natural sweetener are endless.
I certainly have a far greater appreciation for professional sugarers and the price they charge after doing it myself. On our small homestead operation, we average about 1 gallon or so of finished syrup at the end of a boiling day. That’s one gallon of maple syrup after a 12 hour day! Which is exactly why we will be hoarding it all and rationing it throughout the year to get us to next season like I know so many others do…
Making maple syrup at home is a fun, fascinating, and delicious process that I have really enjoyed. Are you a sugarer? If so, I’d love to hear how this season is going for you and what your process is like!


Pingback: Grilled Sticky Maple Glazed Chicken Legs on the Vermont Evaporator Sapling - The Modern Day Settler
This is an awesome experience and thank you for posting it. Those of us who do this as hobbiest’s appreciate the efforts of others who share what works and yes at times, what doesn’t.
So glad for Vermont Evaporator…,they make us feel like we do belong in the “sweeter” side of life. What a great bridge to spring!
It’s a great hobby, and yes they make a fantastic product that makes the process efficient and enjoyable!