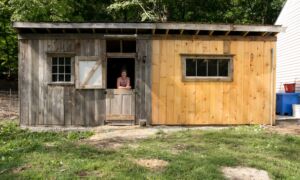
We have finally done it. After years of raising Ranger meat chickens we have FINALLY designed and built the ultimate mobile chicken coop to fit our needs. No more hoop houses or chicken wire lined wooden frames that need perfectly level ground and constant repair. No more brooder boxes and transitioning to a coop. And best of all, NO MORE TARPS! It has taken us several years and a lot of headaches and grief, but by Joe we have finally done it. Last year we started it, this year we finished it. Our mobile chicken coop dubbed “Big Daddy’s Meat Wagon 2.0” is officially completed with its first flock inhabiting it.
The ultimate goal for this chicken coop was very simple and basic: Something mobile that would allow us to easily rotate it around our rocky and sloped pasture. I never want to have to shovel chicken poop again, and it had to be set up for use from day old chick brooder until butchering day. It also had to be largely made of existing material we had lying around from other projects, but couldn’t be a hideous eyesore. Seems simple enough…
The Basic Design
Dimensions and Floor
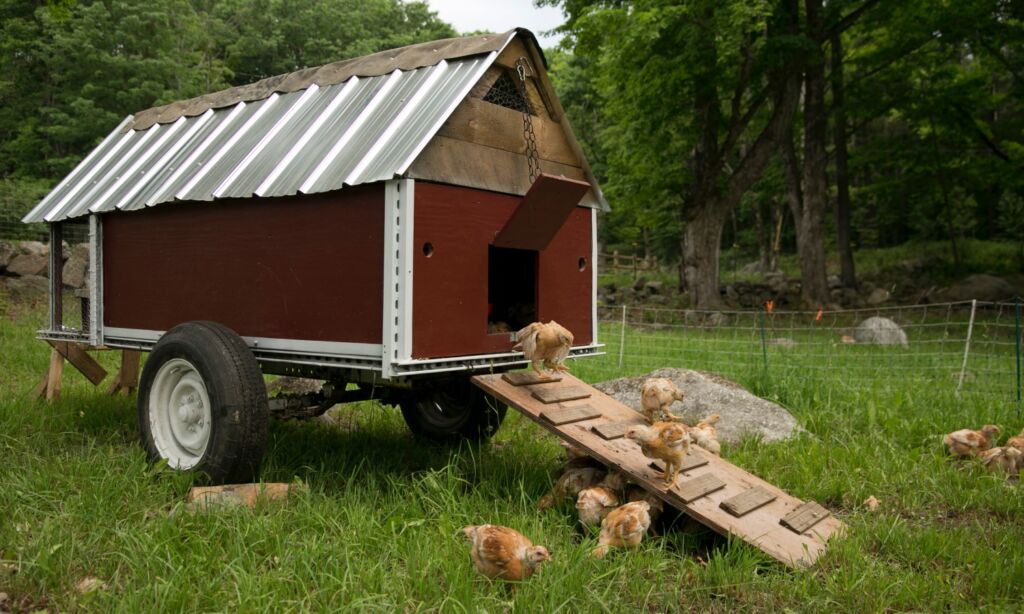
The design is extremely basic as it’s built on the frame of a 6 foot trailer that we already had and rarely used. Nick welded a two foot extension, giving us 8 feet total of coop length. With its ~4 foot width, it gives us an area of 32 squarish feet total with two (easily) removable roosts running the length of the coop. We are at the point where we no longer need to raise a million chickens a year thanks to the abundance of pork and lamb we raise. So for our 30+ birds we are shooting to keep for butcher, this is a fine size considering that the coop is merely serving as a brooder and a place to roost at night. From sun up to sun down they will be outside foraging on our pasture.
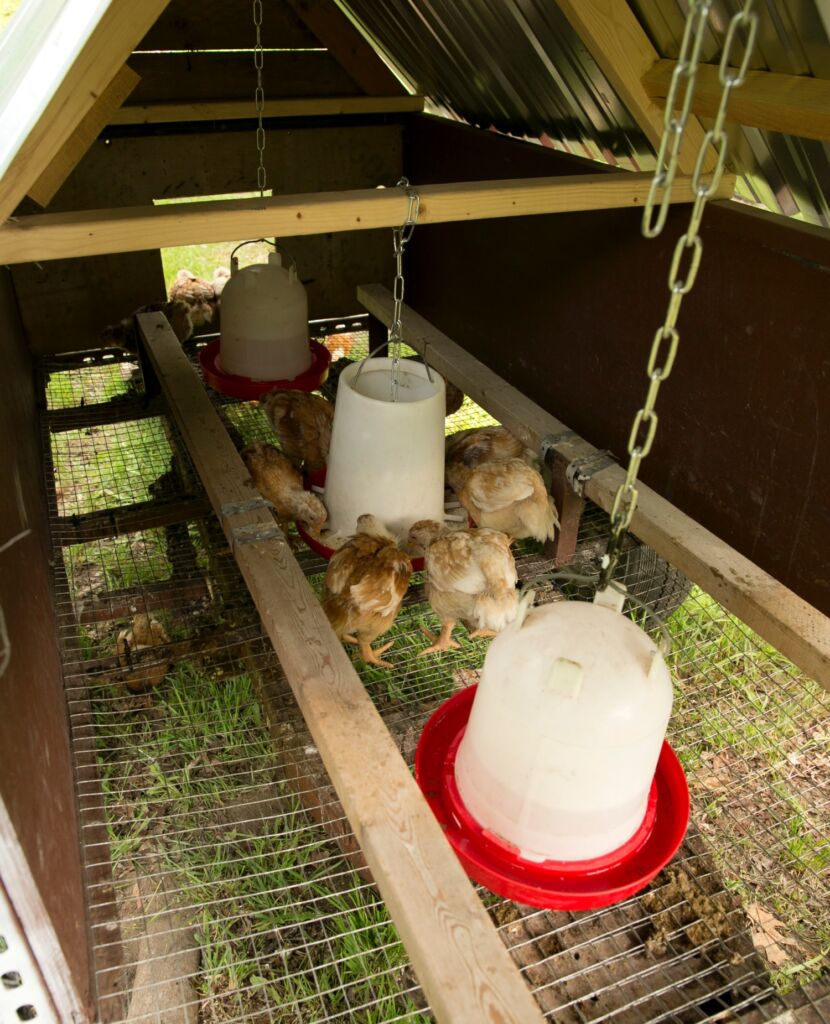
We have an abundance of hardware cloth leftover from other projects, so the “floor” of the mobile chicken coop Is 1″ hardware cloth. Not only is it strong and able to withstand the weight of 30 full sized grown birds, but it is more adept to keep a predator out than something like chicken wire.
The first two weeks of life the chicks are small and there are concerns about them hurting a leg or foot walking on the wire floor. They could potentially drop a foot through and get stuck, break a leg, etc. But remember, one of my requirements was that this be all inclusive, so it has to easily be adapted to be used as a brooder. To protect the chick’s feet (as well as help retain heat) we popped out the roosts and lined half the coop floor with pieces of cardboard with a cardboard dividing “wall”. Shavings go on top, hang a heat lamp from the roof frame, and voila, we have a brooder! Once the chicks are feathered out and bigger around the 2 week mark, the roosts will be put back in, and the cardboard can be taken out and composted. This 1″ square floor will support their feet, but most importantly when they go to roost at night their manure will directly fall through and onto our pasture fertilizing it. Added bonus: no more shoveling chicken poop for me!
We keep the food and waterers in the coop for the next couple of weeks to help train the chicks to go back to roost at night. They learn this is where they sleep, eat, and drink. Once they’ve gotten bigger and need more space in the coop, we switch to our large waterers and feeder that will go outside. At this point the coop is strictly for sleeping.
The Roof
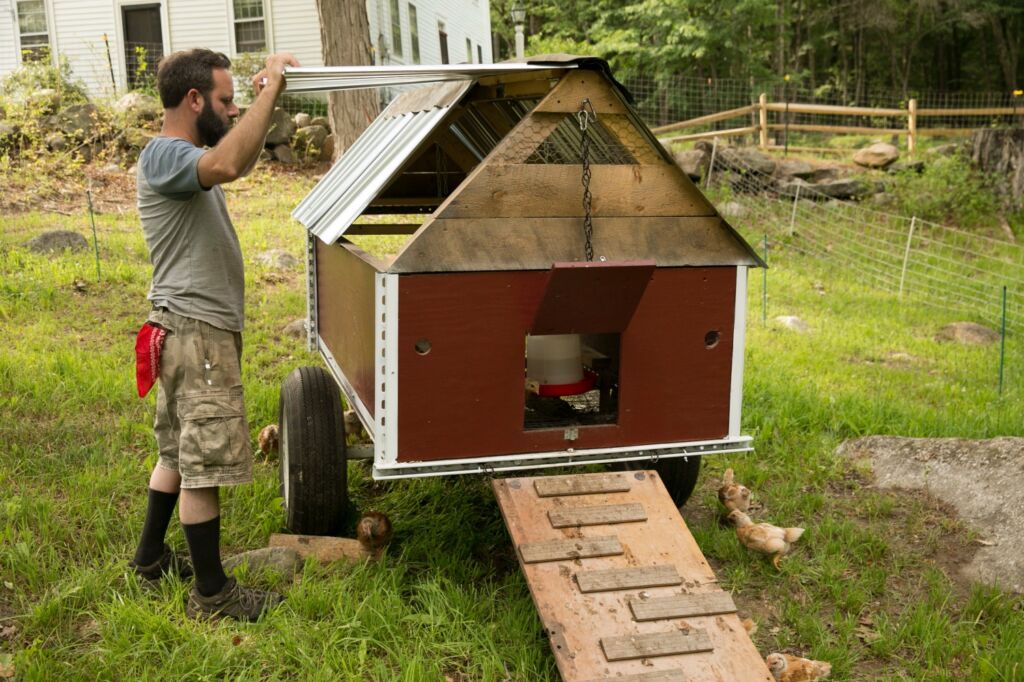
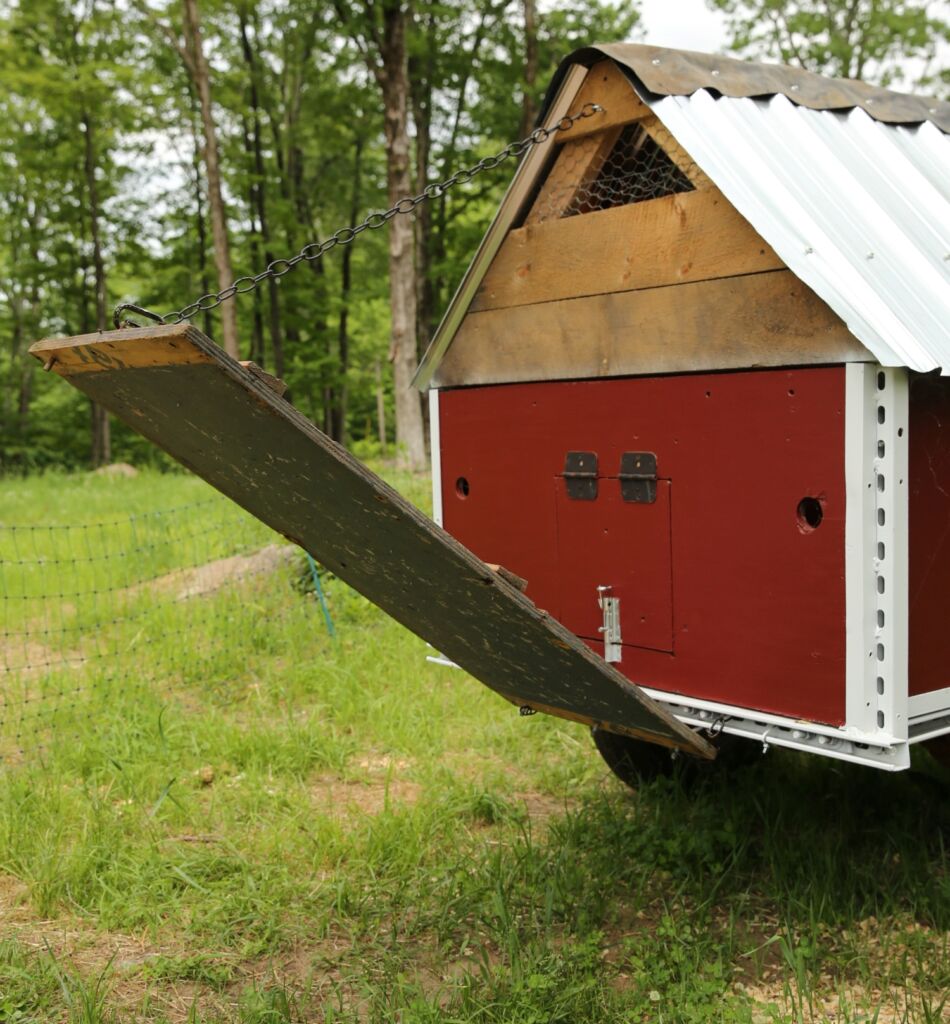
The roof is a simple A-frame style roof made from leftover galvanized metal roofing. But, we knew we would have to reach in to change water, feed, and adjust the heat lamps when the chicks were young. Then we’d have to reach in to grab full grown birds on butchering day. Knowing this, we made one panel of roofing on each end and the opposite side hinged to allow us easy access inside the coop. So, the front and back of the coop each have a hinged panel on opposite sides.
With this hatch set up, a standard metal roof cap wouldn’t work because it doesn’t allow any flexibility at the hinge. So, to overcome this we used some scraps of rubber roofing. It gives protection so the rain doesn’t come pouring through, but allows that much needed flexibility in the two hinge points in the roof. PS this was my idea. Nick wanted to cut some tarp and call it good, I said no tarps, this is the year we are tarp-less! And then I got some rubber roof scraps from my father in law. Problem solved 🙂
The Ramp and Door
I wanted this coop to be as functional and as easy to move as possible. I didn’t want to have to carry a million things with each rotation, and I didn’t want a thousand different hooks, chains, etc hanging off it either. Simple was the goal and remember, a requirement was it needs to look good!
The door is a very standard hinged door. It flips up and is held open by a hook on the door, that loops through a chain that is secured above near the roof’s peak. It has a simple sliding bolt to lock the birds in at night as well.
The ramp is connected to the coop in a secure but easily removable way. Long bolts are screwed on both sides at the top of the ramp, and they each go through the opening in a short length of metal chain that’s fastened to the frame. It’s strong, will support the weight of the birds, and will not go anywhere. Last year when we would go to move the coop we had to remove the ramp and carry it. It easily pops out no problem, but it was just another thing to carry. So this year, I put an eye bolt at the bottom of the ramp. On the same chain that the door hooks onto to stay open, there is a carabiner clip that hooks to the eyebolt on the ramp. Holding the ramp up at an incline gets it off the ground for transport, while simultaneously putting tension on the hinge point to keep it in place.
Finishing Touches
What would a project be without the finishing touches? I think that for the first time ever we actually put the finishing touches on a project. Basically, everything else we have done we get it to 98% and then it comes down to the little details that really pull it all together aesthetically, and we’re like ehhhhh we will do it another time. Then we don’t.
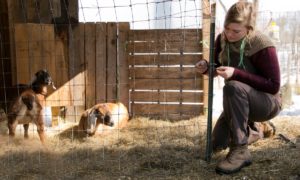
Any opening was covered with hardware cloth or chicken wire for ventilation. While chicken wire isn’t “predator proof” like hardware cloth, nothing is guaranteed. If an animal is that determined, they will find a weak spot. Thankfully we aren’t really concerned with predators because we have three levels of protection: our LGD Annie that patrols the permanent fenced pasture at night, the electric netting that surrounds the coop, and then the coop itself that houses the birds. Despite this, we try to make it as impenetrable as possible.
For aesthetic purposes (remember, not being a hideous eyesore was a requirement!) we used rough cut wood to cover part of the roof’s peak so it wasn’t completely open. We wanted to allow enough open for ventilation, but not so wide open that it would allow rain in. Finally, the cherry on top was paint. Using leftover SW Rookwood Red from painting the house doors, I painted the body of the coop, and used Rustoleum white spray paint on the metal frame and edges that happens to look like trim. It looks like a little mini barn on wheels rolling around the pasture.
The only thing we didn’t get to that we plan to incorporate into the design next year is a watering system. For now, we use a couple of 7-gallon waterers from our local co op that sit out on the ground. Next year, we plan to weld a bracket to the neck extension of the coop to mount a water tank attached to some kind of watering system. We didn’t get to it this year, so we have a year to figure it out.
Moving Day
The meat chickens will follow our sheep being rotated around our pasture with Premier One Electric Netting. They will spread out the sheep and donkey manure, eat grubs, bugs, and grass, and fertilize our soil with their own nitrogen rich manure.
This mobile chicken coop has made our moving process incredibly easy, just like our mobile livestock shelters have for our other animals. In the morning while the birds are still locked in the coop from the night before, we take down the electric netting and toss it over the top of the coop. We back up the tractor to the hitch and hook it up. Waterers, feeders, and the wooden stand we use to prop the wagon up when it’s parked is thrown in the bucket of the tractor. Then, away she goes! Once it’s moved to the next location we unhook the wagon and prop it back up with the stand, put feeders and waterers in place, put the netting back up, chock the tire, and then open the door to let the birds out.
This is an incredibly simple process that start to finish takes less than a half hour. No chasing or herding birds, no repairing ripped tarp roofs. Just simple, easy, stress free rotational grazing which makes for happy birds and happy homesteaders.
Finishing this project has been a huge weight off of our shoulders. We have created for ourselves the tools that allow us to be more efficient, which in turn will allow our animals to be more productive. Not only in aerating and fertilizing our soils to improve our pasture, but by providing them a fresh natural diet that allows them to express their natural behaviors while creating the best nutrient dense chicken possible.
It may have taken us a while to get to this point, but without trying all of those other aforementioned housing options, we wouldn’t have been able to really hone in on what worked and what didn’t for us. Or, truly appreciate what we have now in this mobile chicken coop. So as it always seems to go, the headaches, late night repairs, and moments of regret were worth it.
Happy Building,

**Some of the links on this site are affiliate links. I only link to products I have used, abused, and believe in. While I do not make commissions on these, they do allow my partners to track business I have generated for them. I wholeheartedly appreciate you using my affiliate links for any of the products I recommend you may purchase! It keeps the educational and informative content coming.

Yes thank you so much!! We just got our meat birds and I have been looking at all sorts of designs. This is by far the best because no tarps and ugly stuff surrounding it!
Here’s to being tarp Free!!!!
This is amazing! I love the design. We don’t have chickens yet but we are about to make the move to a larger property. I did have one question: do you also have laying hens? Where do they live? Do you put them in a tractor too?
Smart to gather your research now! We do not have laying hens. We got rid of them all a little over a year ago that I explain in this post The ducks have a small coop off the back of our shed, and they basically just go wherever they please!
I like this, I’ve done it from my garage brooder, to a coop, then, they basically refused to go outside even when starved🤦♂️.
Yeah that got old!
This looks perfect!! We are going to try to make this for our farm. Thank you for posting on this.
You’re very welcome! Good Luck!
How do you get a heat lamp on there? Do you have electrical pulled?
When it’s a brooder early on, just pull it next to the barn and plug in to an outlet there.
We are soon to get chickens… city girl gone country lol. Do you have to worry about flying predators where you are? Here in East Tx. we have hawks among other hunter birds. I love the idea of this but worry my chickens might get picked off. I would like to do both meat and layers, would it be best to raise them separately (or better to just do dual-purpose birds)? I have found you to be very informational as well as inspirational, as I follow you on IG. I have so much to learn but I’m loving it, even just doing the research:)
We do have some aerial predators, but I have two dogs that are constantly outside and they keep them away. I have yet to lose a bird to a hawk or eagle! Thanks for following along!